[ 63XC.COM | HOW TO | REDISHING ]
Rear wheel repurposing Setting up a fix? It's in the spirit of fixed gear to make use of something you have already or something that somebody gives you. So, before you shell out for a new wheel, consider the alternatives. Option A. Just Good Enough On a bike with 120mm rear spacing, you may be able to use an old five-speed wheel without modification. This is the easiest and cheapest way to get out and riding. Step 1: Remove the freewheel from your 5spd wheel. Now build 'er up!
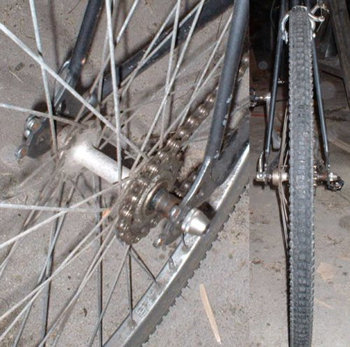
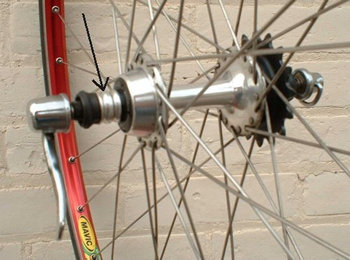
Here's how it looks on my Fuji. This is a 700c wheelset that I bought new for a whopping $60 in 1989. Riding this setup reminds me that, no matter what happens, I can always have fun on a simple bike. I'm running a BMX chain and a 43x18 gear. It may not be aesthetically pleasing, but it works just fine. Remember: check your chainline before you hit the road on your repurposed five-speed wheel. A misaligned chain is a worn chain. It can be dangerous to throw a chain on a fix, and in any case you shouldn't put up with a noisy drivetrain just to save a few bucks. Option B. Re-Space/Re-Dish Option B works better than option A, plus it finally gives you a good use for that old freewheel-style wheelset from your garage. Whadda you got? Your old Dura-Ace hubs laced into Mavic Open4 rims? A nice straight set with plenty of miles left in 'em... Respacing and redishing will involve some time and access to a truing stand, but if you're lucky the cost will be zilch. And you'll get a 'balanced' wheel, equally dished on both sides. It's strong and it looks great. Step 1: Re-space the hub But you can change that. Remember that the axle is threaded all along its length, and that the other parts are just threaded on. To respace the hub, you shuffle the spacer washers which you can see outboard of the bearings. Got the idea? Good. Undo the locknuts and take off the spacers. Take note of where everything went. Might as well clean it up while you're at it. If you're really keen you might want to whip out the bearings and regrease 'em.
Now, shunt one of the spacers over from the drive to the non-drive side, and reassemble it all loosely. Using a small metric ruler, measure the distances from the hub flanges (where the spokes attach) to the ends of the axle. Measure again. Were you lucky? If it didn't go first time, try different combinations until it does. The worst that can happen is that you have to shell out 50c for a new spacer--or salvage it from another hub!
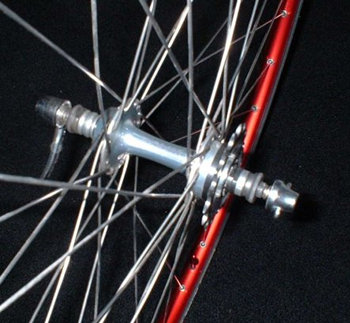
I'll admit that I was really lucky with the rear wheel I converted this way. The schematic shows what happened. The hub originally had two equal-sized spacers on the drive side. All I had to move one of the pair from the drive to the non-drive side. Step 2: Re-dish your wheel Loosen all the spokes on the drive side, half a turn at a time, until they're pretty loose. Now start tightening the ones on the non-drive side. If your luck holds, you'll center the rim before they bottom out. If not, you'll have to buy a new set for the non-drive side. Not to worry. Chances are that you'll be OK on the drive side... we hope. When the rim is centered in the stand, tension and true the wheel, just as you would a front wheel. Nice an' easy. Step 3: Finishing off Here's how it ended up. Tim Allen would have been proud of me, don't you think?
And here's the story of how I got it in the first place. My friend Murphy had some old wheels hanging in his garage. His wife kept banging her head into them. Finally, she told him that, if he didn't do something with those wheels, she would. Murphy called me. "Hey, Swede, do you want some old road wheels that I've got in my garage?" "Yep." And that's how I got five nice older rear wheels, all with good Ultegra or Dura-Ace hubs. This one was originally laced 3x to a 36HMavic GL330 tubular rim and I'll bet it didn't have 300 miles on it. The sidewalls were totally unmarked. I was able to not only move all the spokes over to this red Mavic MA-2 clincher rim, but to re-space and re-dish it to a FG wheel as well. What's that you say? Luck? How about the fact that a mail order bike shop somehow sent me this nice rim by mistake, and said "Oh, just keep it" instead of asking for it back? I hope you're this lucky too! If so, you'll get a nice wheelset quicker than your LBS could have built it--and for free (or nearly). Option C: A New Wheel Of course, you may not have any decent old wheels laying around for conversion, and no friends doing garage clearances. That means that you get to lace yourself up a spankin' new rear wheel using an appropriate hub. (Check 63xc.com's hub chart and Links page for manufacturers.) This is the rear wheel on my singlespeed mtb - da' Swamp Donkey. It's got a 32h Surly 1x1 hub laced 3 cross to a Syncros Lil' Snapper rim. Of course I totally blew it cost-wise when I used black DT Revolutions spokes. (The matching front is laced radially to a black LX hub that I bought on sale for $7.95, so that made up for some of my extravagance.) Bombproof, a no-brainer, but it cost some money to build. Happy Riding, Dennis [ TOP ] |
Writer
Dennis Bean- Larson runs the excellent Fixed Gear Gallery, where this article first appeared.
Date
v1.0 written January 2003
Related
Dennis has a trail piece in the Here&Now
section.
Lockring
The official 63xc.com line is that you need a left hand thread lockring on your hub: you can find a listing of suitable product on 63xc.com's FG hubs listing.
Mailing list
Join the 63xc.com list.