[ 63XC.COM | HOW TO | DIY 2FG ]
Fixin' the 2spd Bendix hub: an alternative method
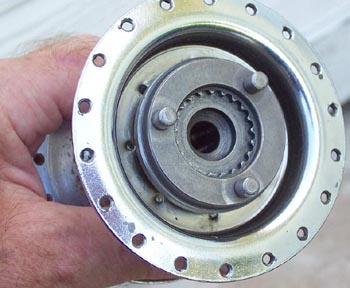
My inspiration for this project was a fine article I read on this very site. It was by Genny Gebhardt and it was entitled Two-Speed Fixed Gear Hub. If you plan on working with a Bendix, read this article before you do anything else. It will help you understand the hub's workings. After I'd read Genny's article, it didn't take me long to obtain a Bendix of my own and braze it up. The procedure went well. I was really pleased with the end result. About the same time, I got the news that Bikesmith had closed its doors for good. The game had changed. No-one was fixin' Bendixes commercially anymore. From here on in, the only way to get a 2FG would be through DIY. Since I have a workshop, a brazing project like this is fairly easy for me. For most people, tho', brazing something together is a hassle. I started to think about another way to make a 2FG, one that would be accessible to anyone. I figured out a conversion using Loctite and JB Weld and some very low-end power tools. The test wheel that I built up using this method has over 750 miles on it now and is still functioning perfectly. If you want to make something similar, here's what you need to do. First you'll want a Bendix two-speed hub. They're not that easy to find! If you're really lucky, you might turn one up on eBay, but NOS from an oldtime bikeshop is probably your best bet. I got mine from an 'old bike' collector. Once you've obtained your hub, you need to disassemble the hub and degrease it. (If you don't like chrome, you can sandblast the casing for the 'Bad Boy' matt look. I planned to repaint mine blue to match my bike.) Before you remove the driver assembly, the hub looks like this:
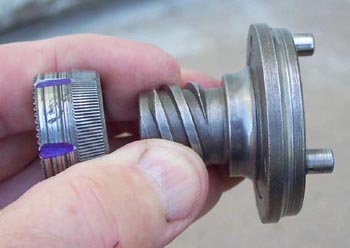
You will make some simple, irreversible changes that gum up those internals, locking out the hub's inbuilt freewheel. Remove the driver assembly. Separate the driver from the drive screw, and grind notches in the driver. I used a bench grinder.
Grind matching notches on the inside of the hub shell. I used a Dremel tool with a ball end burr. These notches will help 'key in' the JB Weld between the drive screw and the shell. Now, put the driver assembly back together (don't forget to include the ball race). Spread Loctite #271 on the spiral threads of the drive screw and replace it in the shell. Once it's in place, rotate the drive screw to tighten the assembly. Hold the screw in place with rubber bands until the Loctite has set up. After the Loctite has set, add JB Weld inside the hub and around the drive screw. To ensure a strong weld, use lots--but leave enough clearance (1/4 inch down from the flat surface of the drive screw) so that the ball race which goes on the outside of the drive screw can turn freely.
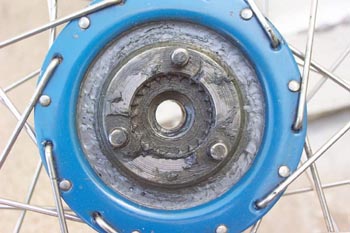
Replace the other hub parts, and you should have a working 2FG. Val and the Bikesmith guys used to set theirs up with a barcon shifter as a control.
[ TOP ] |
Writer
Lewis Campbell is a 64 year old, formerly British (Potters Bar N.London), retired machinist now living car-free in Texas.
Photos
Photos by Bales Machine & Design.
Date
v1.0 August 2004
Related
Lewis says: "I'm not a 'business', I don't sell hubs and I don't want your money. However, if you have a question about this procedure, email me. I will try to help."
Lewis recommends you to Genny G.'s seminal article on the Bikesmith 2FG.
Legal
63xc.com and Lewis Campbell are not liable for any damage you do to yourself as a result of reading this article. Do not operate power tools without eye protection. Make sure you test your 2FG in quiet traffic free conditions.
Mailing list
Join the 63xc.com list.